 Polski





- 98% satisfied customers
- 72h delivery
- 30 dni na zwrot

Adjustable reamer 10.5-12 mm NRZe
2742
€51.79 tax inc.
Net price: €42.11
Description
Adjustable reamer 10.5-12 mm – hand reamer for metal
Technical data – HSS blades, shank with square drive for a tap wrench
| Technical data | |
|---|---|
| Adjustment range | 10.5–12 mm |
| Designation | NRZe to PN |
| Blades | HSS, in inclined grooves |
| Diameter adjustment | two nuts |
| Shank diameter | 6.0 mm |
| Shank square | 4.8 mm |
| Overall length | 140 mm |
| Blade length | 42 mm |
| Drive | tap wrench |
| Origin | made in Poland |
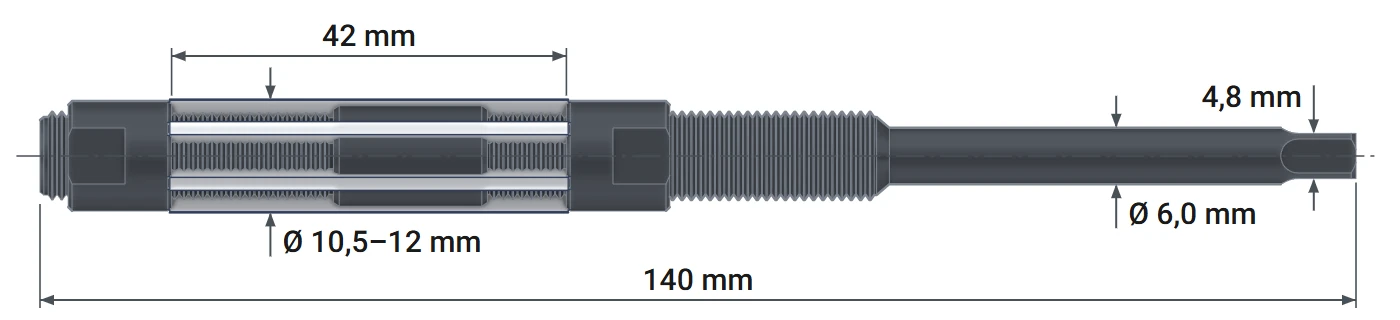
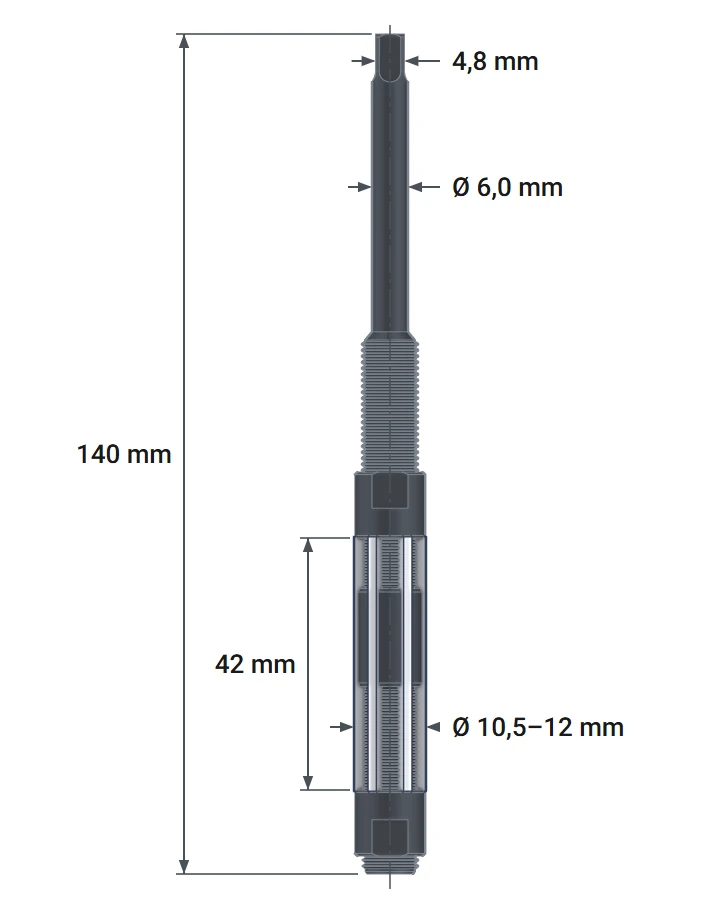
Adjustable reamer 10.5-12 mm NRZe finishes holes of any diameter from 10.5 to 12 mm. Set the diameter with two nuts. They move the high-speed steel (HSS) blades in the inclined slots in the body. A single tool can therefore produce a 10.5, 11, or 11.3 mm hole. Operate it by hand with a tap wrench fitted to the square on the shank.
Manufacturers design adjustable blade reamers for repair and assembly work. They are useful wherever a hole needs to be fitted to the part at hand. The diameter is then set to the size of the part, rather than to the standard size series of fixed reamers.
Which size to choose: 10.5-12 mm and adjacent sizes
The 10.5-12 mm reamer covers the entire range of the 11-12 mm reamer and part of the 10.25-11 mm range. It shares a 6 mm shank, a 4.8 mm square, and a length of 140 mm with the 10.25-11 mm reamer. The 11-12 mm reamer has a 5 mm square and is 135 mm long. All three can be turned with a No. 1 tap wrench.
How diameter adjustment works – blades and two nuts
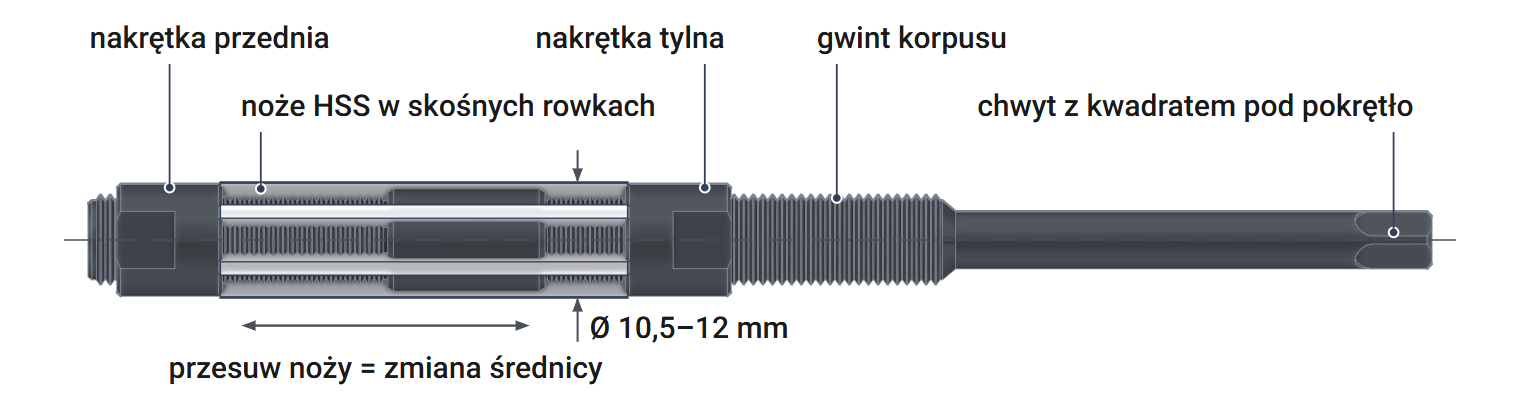
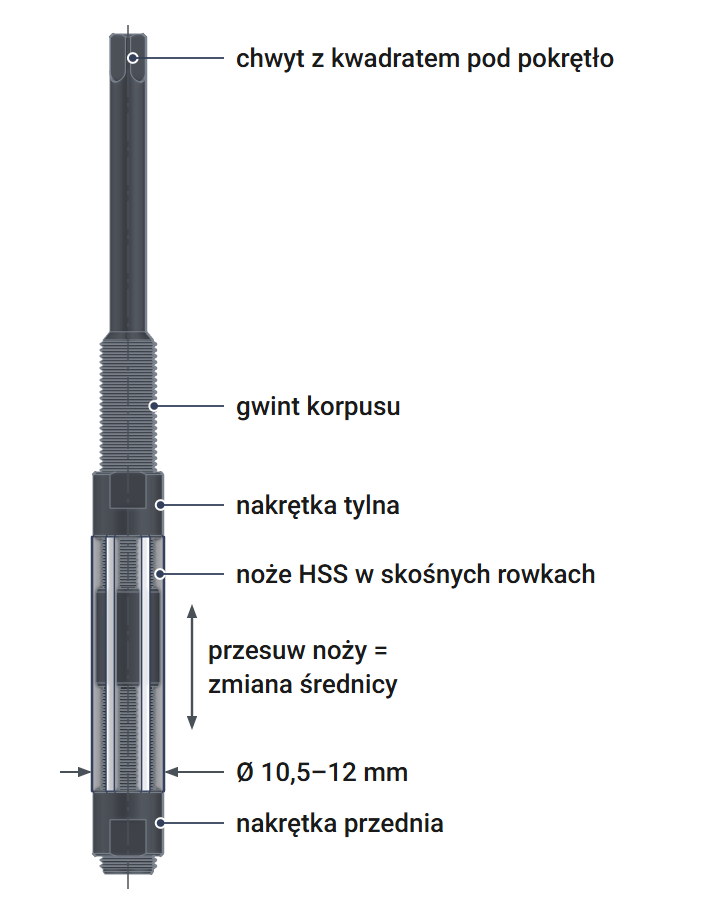
NRZe reamer construction and measuring the diameter setting
The body has inclined grooves around its circumference, each holding an HSS blade. Two nuts, front and rear, retain the blades at both ends. Moving the blades along the grooves moves their cutting edges away from or toward the axis. This changes the cutting diameter over a range of 1.5 mm, from 10.5 to 12 mm. This is why the tool is also called an adjustable reamer.
Adjustment in three steps
First, loosen one nut. Then tighten the other — the blades will move to the new diameter. Finally, lock the blades by tightening the first nut. The rear nut, on the shank side, provides the main clamping force; the front nut is only snugged up. Tighten carefully. Excessive force bows the blades outward and causes the reamer to catch in the hole.
How to measure the set diameter
With an even number of blades, measure the diameter across two opposite blades using a micrometer. With an odd number, a groove lies opposite each blade, so the micrometer will read too low. In this case, use a setting ring or a hole of known diameter. Insert the reamer and expand the blades until they contact the hole wall.
How to ream step by step – tap wrench and clockwise rotation
Guidelines for using an adjustable hand reamer
Insert the reamer into the hole and apply light pressure so the blades engage the wall immediately. The tap wrench must fit the square closely to ensure smooth rotation without jerking. Align the reamer axis with the hole axis. For a longer hole, check the alignment with a square.
Hand reaming in six steps
1
Drill a hole
0.05–0.15 mm smaller than the finished hole, e.g., 10.9 mm for 11.0 mm.
2
Set the diameter
Loosen one nut, move the blades with the other, then lock the first nut.
3
Fit the tap wrench
Fit it to the square and align the reamer with the hole axis.
4
Turn clockwise
Turn smoothly with light, even pressure.
5
Withdraw the reamer
Keep turning clockwise, including as the blades leave the hole.
✓
Check the hole
Too tight? Set a larger diameter and make a second pass.
Guidelines based on adjustable reamer manufacturers' instructions.
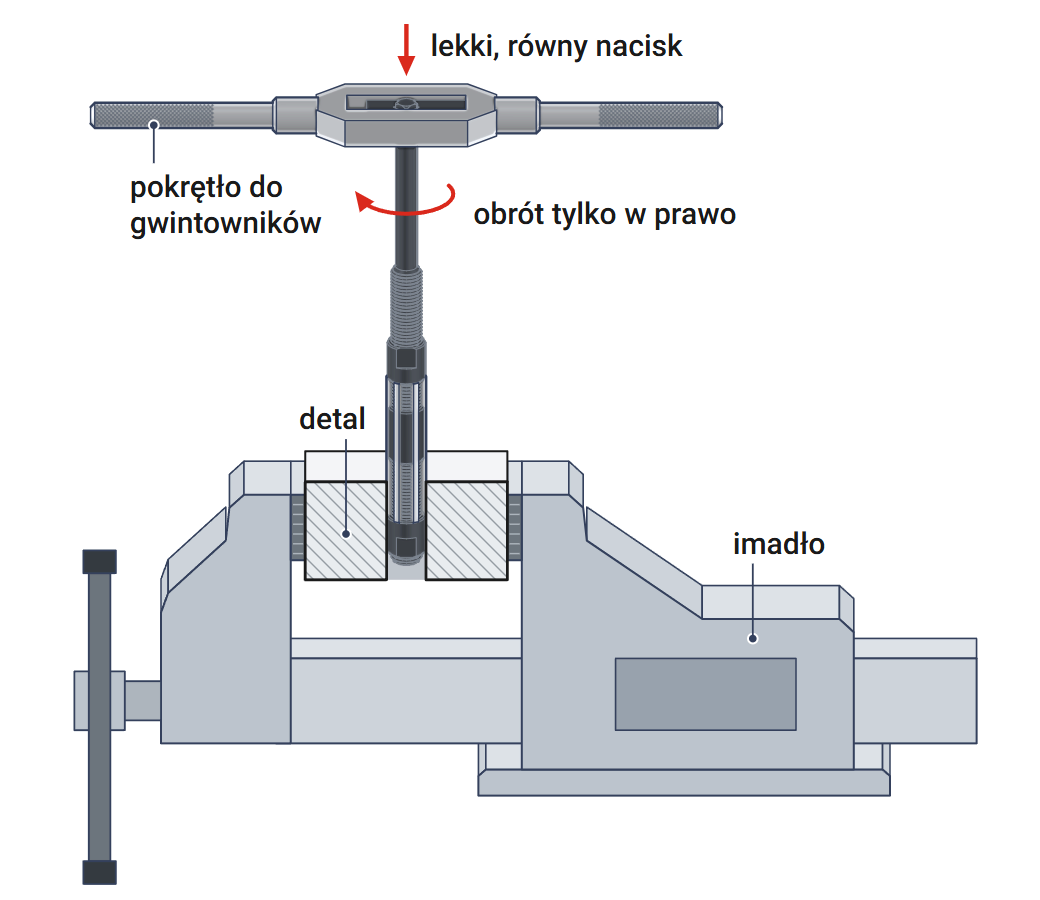
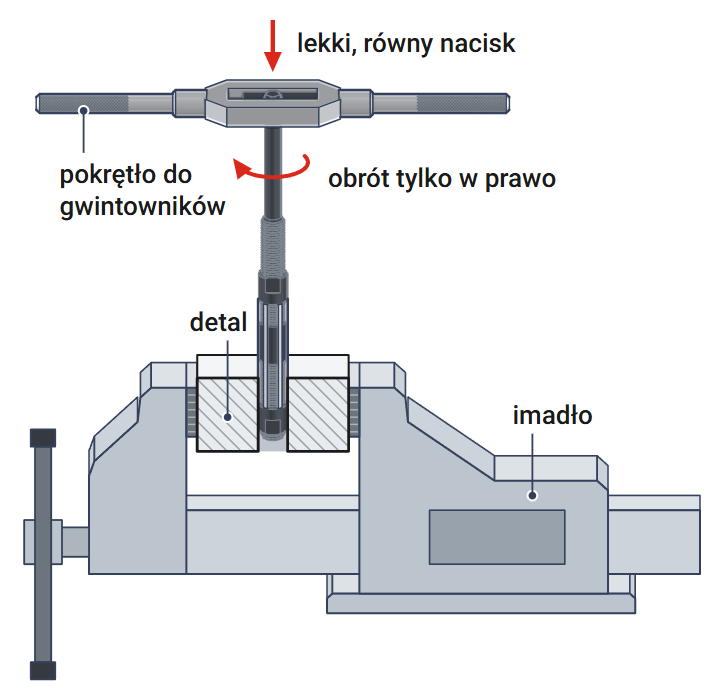
As the blades emerge from the far end of the hole, resistance drops suddenly. Reduce pressure at this point, but maintain the same turning speed. Otherwise, the reamer will jump through the end of the hole and leave it uneven.
▲
Never turn counterclockwise
Turning counterclockwise in the hole dulls the blades and may chip them. It can also loosen a nut and change the setting. Turn clockwise when withdrawing the tool as well; otherwise, you will scratch the hole wall.
How much material one pass removes
Reaming allowance and drill bit selection
This tool finishes a hole rather than drilling it. It removes a thin layer: from 0.05 to 0.15 mm on the diameter in one pass. A smaller allowance produces a smoother wall. Too little allowance is detrimental, as the blades rub against the wall instead of cutting and become dull faster.
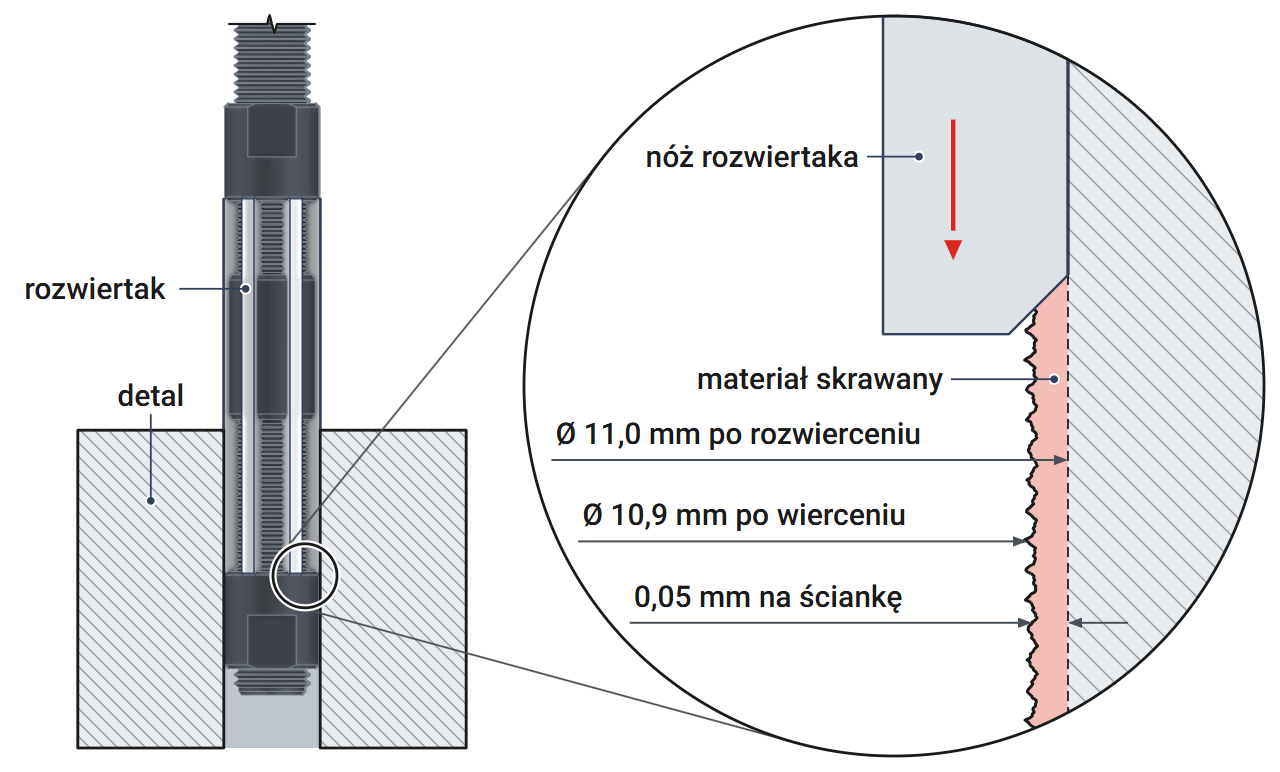
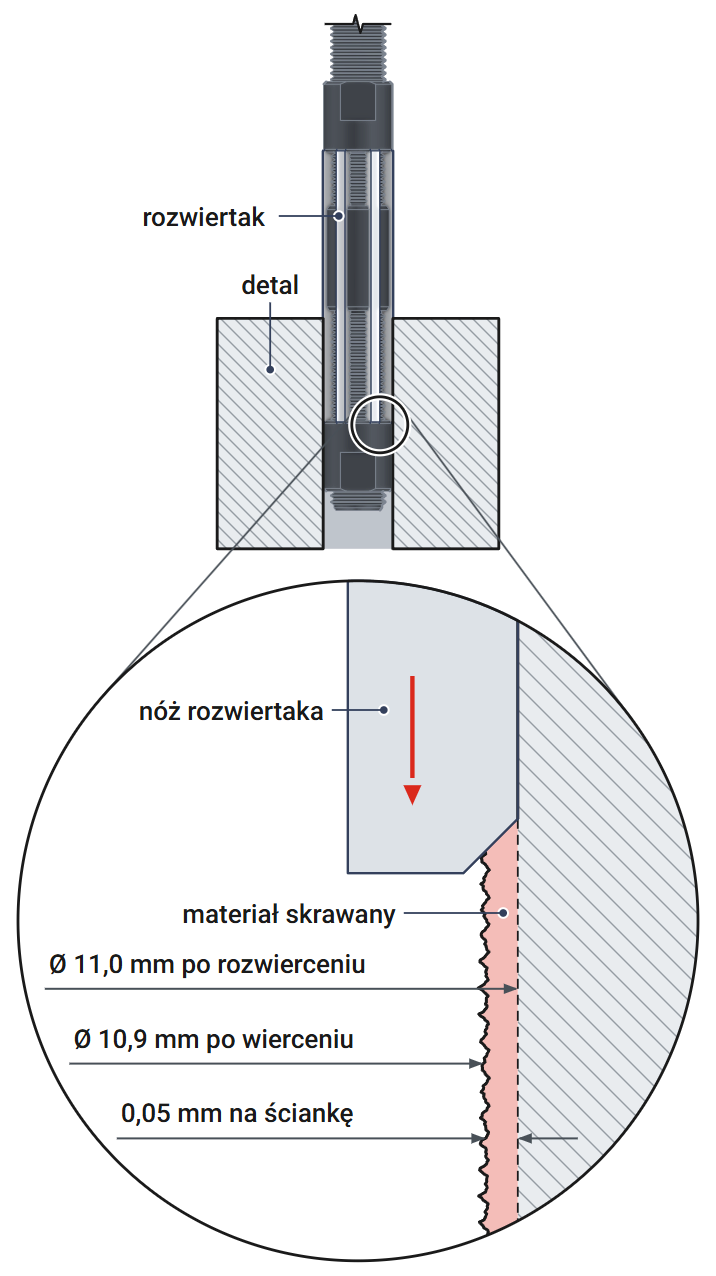
Calculation: 11 mm hole after drilling with a 10.9 mm drill bit
Allowance on diameter = finished hole diameter 11.0 mm − drill diameter 10.9 mm = 0.1 mm. Half of this, or 0.05 mm, is on each wall. This layer is thinner than a sheet of paper. A reamer set to 11.0 mm will remove it in one pass.
| Finished hole [mm] | Drill bit [mm] | Diametral allowance [mm] | Layer thickness at the wall [mm] | Passes |
|---|---|---|---|---|
| 10.5 | 10.4 | 0.1 | 0.05 | 1 |
| 11.0 | 10.9 | 0.1 | 0.05 | 1 |
| 11.0 | 10.8 | 0.2 | 0.1 | 2: set to 10.9, then 11.0 |
| 12.0 | 11.9 | 0.1 | 0.05 | 1 |
Remove a larger allowance, e.g., 0.2 mm after a 10.8 mm drill, in two passes. Set the first pass to 10.9 mm and the second to 11.0 mm. Two passes, preliminary and finishing, also produce the smoothest hole wall. However, each must remove at least 0.05 mm.
Tap wrench and lubrication – what to prepare
Tap wrench for a 4.8 mm square and oil suited to the material
Tap wrench No. 1
The shank square measures 4.8 mm, almost the same as the 4.9 mm square on M5–M8 hand taps. The same tap wrench therefore fits. Choose an adjustable tap wrench to DIN 1814, size No. 1. It accepts squares from 2 to 6.3 mm and fits M1–M10 taps. The smaller No. 0 tap wrench has a maximum capacity of 5 mm, just above the reamer's square size.
With oil or dry
| Workpiece material | Lubrication |
|---|---|
| Steel and cast steel | cutting oil or emulsion |
| Aluminum alloys | cutting oil or emulsion |
| Gray and malleable cast iron | dry |
| Bronze and brass | dry |
Remove chips from the reamer after use. Before adjusting the blades, also clean the body grooves so the blades move evenly.
Adjustable reamer 10.5-12 mm NRZe replaces a set of fixed-size reamers over a 1.5 mm range. Set the diameter with the nuts and check it with a micrometer or ring gauge. It removes 0.05 to 0.15 mm on diameter in one pass. Use a No. 1 tap wrench, the same as for M5–M8 taps, and always turn clockwise.
Questions about adjustment, allowance, and tap wrench selection
Frequently asked questions about hand reaming
0.05–0.15 mm smaller in diameter than the finished hole. For a 11 mm hole, use a 10.9 mm drill. After a 10.8 mm drill, ream in two passes: to 10.9 and 11.0 mm.
Clockwise, just as when reaming. Clockwise rotation protects the blades and the hole wall. It also keeps the nuts in place, so the setting does not change.
With an even number of blades, measure across two opposite blades with a micrometer. With an odd number, use a setting ring or a hole of known diameter.
Yes, at very low speed and with plenty of oil. At high speed, the hole may end up larger than the setting. Using a tap wrench provides the best control.
Product accessories


Reviews
No customer reviews for the moment.
Shipping
All orders are delivered by courier company GLS. For orders exceeding 369 PLN gross shipping is FREE
| Courier GLS | Przelew24 / Prepayment | 14,76 zł gross | Delivery time 1 working day |
| Courier GLS | Cash on delivery | 17,26 zł gross | Lead time 1 working day |
Recommended for you


This website uses its own and third-party cookies to improve our services and show you advertising related to your preferences by analyzing your browsing habits. To give your consent to its use, press the Accept button.
Cookie preferences
Functional cookiesTechnical
Functional cookies are strictly necessary to provide the services of the shop, as well as for its proper functioning, so it is not possible to refuse their use. They allow the user to browse through our website and use the different options or services that exist on it.
Advertising Cookies
These are cookies that collect information about the advertisements shown to users of the website. They can be anonymous, if they only collect information about the advertising spaces shown without identifying the user, or personalised, if they collect personal information about the user of the shop by a third party, for the personalisation of these advertising spaces.
Analytics cookies
Collect information about the user's browsing experience in the shop, usually anonymously, although sometimes they also allow the user to be uniquely and unequivocally identified in order to obtain reports on the user's interests in the products or services offered by the shop.