 Polski





- 98% satisfied customers
- 72h delivery
- 30 dni na zwrot
Description
Dial bore gauge 35–50 mm – construction and technical data
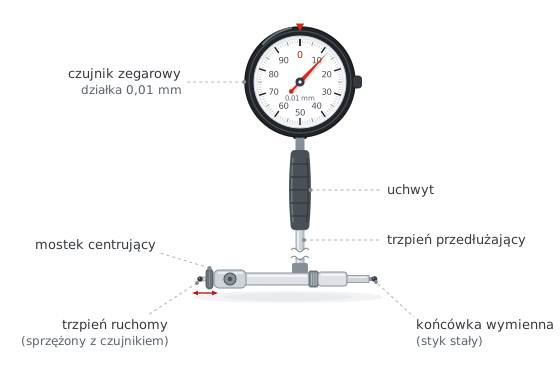
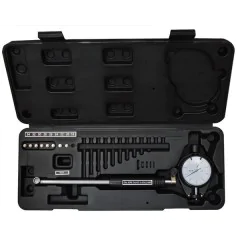
Two-point dial bore gauge with a set of interchangeable anvils
| Technical data | |
|---|---|
| Measuring range | 35–50 mm |
| Graduation | 0.01 mm |
| Instrument type | two-point, with centering bridge |
| Measuring tips | interchangeable, complete set included |
| Packaging | carrying case |
RANGE35–50 mm
GRADUATION0.01 mm
TYPEtwo-point
Measuring bore diameters by comparison
Operating principle of a two-point instrument
Dial bore gauge 35–50 mm is a two-point instrument for measuring internal diameters with a reading resolution of 0.01 mm. The dial indicator shows the result as a deviation from the dimension set using a reference standard. The set of interchangeable anvils covers the entire 35–50 mm range.
Measurement is comparative: first set the instrument to the nominal dimension in a setting ring or an outside micrometer and zero the indicator dial. Inside the bore, the moving contact retracts or extends, and the indicator shows the difference from the setting. The spring-loaded centering bridge positions the head so that the contacts lie across the diameter rather than a chord of the bore.
The extension stem allows measurement of deep bores: bearing seats, bores in gearbox housings, and cylinder liners of small engines. Repeating the measurement in two perpendicular planes and at several depths also checks bore ovality and taper, which are typical signs of wear.
How to measure with a dial bore gauge – step by step
Four steps: from setting the dimension to the result
1 Set the dimension and zero the gauge
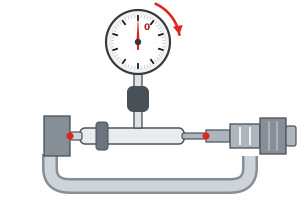
Install an interchangeable anvil selected for the bore. Set the instrument to the nominal dimension in a setting ring or micrometer and rotate the dial to zero.
2 Insert the head into the bore
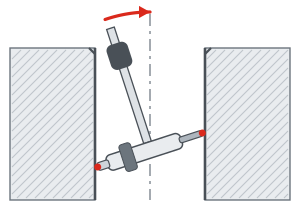
Insert the head at a slight angle and straighten it inside the bore. The centering bridge will press the contacts into position and align them through the bore axis, across the full diameter.
3 Rock in the axial plane
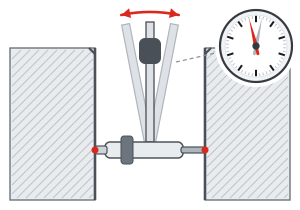
Tilt the instrument slightly along the bore axis and watch the pointer. At the true diameter, the pointer reverses direction — this is the reversal point, or minimum reading.
4 Read and calculate the result
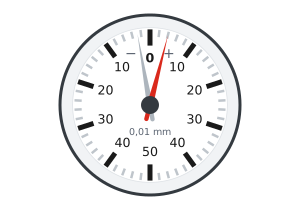
Note the reading at the reversal point, including its sign. The bore diameter is the setting dimension plus the indicator reading.
Reading the result on the indicator dial
Reversal point and deviation sign
The dial indicator with 0.01 mm graduations shows only the deviation from the setting. A reading on the "+" side indicates a bore larger than the setting dimension, while a reading on the "−" side indicates a smaller bore.
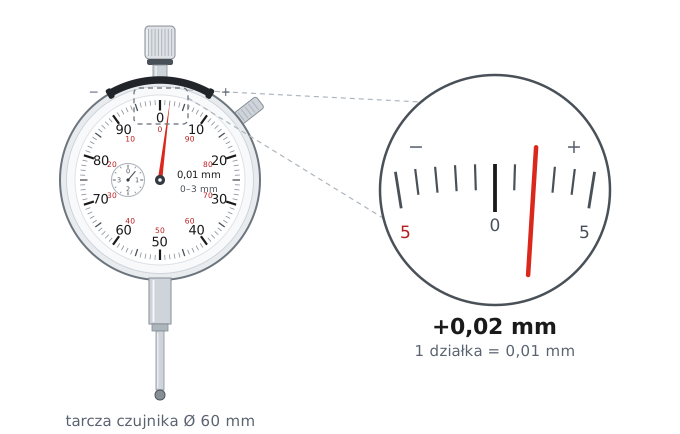
How to read the result
- Rock the bore gauge and observe the pointer reversal point.
- Count the divisions from zero – each division represents 0.01 mm.
- Include the sign: "+" means the bore is larger, "−" means it is smaller than the setting.
Bore diameter = setting dimension + reading at the reversal point (including sign)
Example: setting 42.00 mm, reading +0.02 mm → 42.00 + 0.02 = 42.02 mm
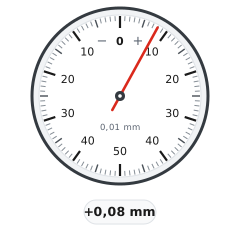
Reading on the "+" side → bore larger than the setting.
D = 42.00 + 0.08 = 42.08 mm
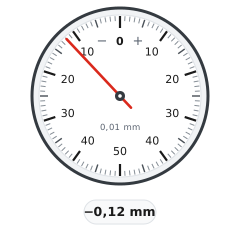
Reading on the "−" side → bore smaller than the setting.
D = 42.00 − 0.12 = 41.88 mm
Measurement tips and limitations
Good bore measurement practice
Accuracy depends on the reference standard
A bore gauge measures by comparison, so it will not give the correct result unless it is set correctly. Zeroing with an outside micrometer combines the errors of both instruments — for accurate measurements, set the dimension using a setting ring. Also allow the instrument and workpiece to reach the same temperature before measuring.
- ✓Measure in two perpendicular planes and at 2–3 depths to detect bore ovality and taper.
- ✓Repeat the rocking motion 2–3 times; the reading at the reversal point should repeat within one division.
- ✓Hold the instrument by its insulated handle, not the stem — heat from your hand affects the result at an accuracy of 0.01 mm.
- ✓After a series of measurements, check zero against the reference standard to detect any accidental change in the setting.
- ▲Clean the bore and measuring contacts before measuring — a chip or oil film will distort the reading.
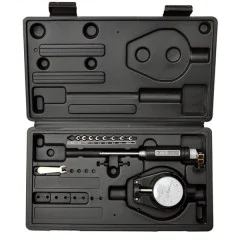
Dial bore gauge 35–50 mm with a set of interchangeable anvils in a carrying case is suitable for inspecting bearing seats and housing bores in workshops and production departments.
Frequently asked questions – dial bore gauge 35–50 mm
Set the instrument to the nominal dimension in a setting ring or outside micrometer and zero the dial. Insert the head into the bore at a slight angle, straighten it, and rock it in the axial plane while watching the pointer. Take the reading at the reversal point, which is the minimum reading; the bore diameter is the setting plus the signed reading, e.g., 42.00 + 0.02 = 42.02 mm.
No, it is a comparative instrument: the indicator shows only the deviation from the dimension set using a reference standard, with 0.01 mm graduations. You need a setting ring or an outside micrometer to set it; a ring gives a more accurate result because it does not combine the errors of two instruments.
A three-point bore micrometer displays the dimension directly and centers itself in the bore, but each instrument covers a narrow range and costs more. A two-point dial bore gauge covers the entire 35–50 mm range with one set of anvils and detects bore ovality because rotating the head gives different readings along the major and minor axes.
Bearing seats, bores in gearbox housings, and cylinder liners of small engines with diameters of 35–50 mm. The set of interchangeable anvils covers the entire range, and the centering bridge positions the head across the diameter, so measurements repeat within one 0.01 mm division.
Measure the bore in two perpendicular planes at the same depth: the difference between readings is the ovality. Repeat the measurement at 2–3 depths, e.g., near the edge and near the bottom: the difference between them is the taper. With 0.01 mm graduations, you can detect wear on the order of hundredths of a millimeter without removing the part.
Reviews
No customer reviews for the moment.
Shipping
All orders are delivered by courier company GLS. For orders exceeding 369 PLN gross shipping is FREE
| Courier GLS | Przelew24 / Prepayment | 14,76 zł gross | Delivery time 1 working day |
| Courier GLS | Cash on delivery | 17,26 zł gross | Lead time 1 working day |
Recommended for you


This website uses its own and third-party cookies to improve our services and show you advertising related to your preferences by analyzing your browsing habits. To give your consent to its use, press the Accept button.
Cookie preferences
Functional cookiesTechnical
Functional cookies are strictly necessary to provide the services of the shop, as well as for its proper functioning, so it is not possible to refuse their use. They allow the user to browse through our website and use the different options or services that exist on it.
Advertising Cookies
These are cookies that collect information about the advertisements shown to users of the website. They can be anonymous, if they only collect information about the advertising spaces shown without identifying the user, or personalised, if they collect personal information about the user of the shop by a third party, for the personalisation of these advertising spaces.
Analytics cookies
Collect information about the user's browsing experience in the shop, usually anonymously, although sometimes they also allow the user to be uniquely and unequivocally identified in order to obtain reports on the user's interests in the products or services offered by the shop.